Learning how to write guides with a step-by-step tutorial format is one of the most valuable skills a content creator can develop. Whether you're building beginner guides for a new audience or writing instructions for a technical product, the structure of each step determines whether your reader succeeds or gives up.
Poorly formatted tutorials lead to confusion, high bounce rates, and frustrated users. Well-structured ones build trust and keep people coming back. The difference rarely comes down to your subject expertise; it comes down to how you organize information on the page.
In this tutorial, you'll learn exactly how to structure each step in your content creation process for maximum clarity, retention, and reader satisfaction.
Key Takeaways
- Each step should contain exactly one action the reader needs to perform.
- Leading with a verb in every step heading dramatically improves scannability and comprehension.
- Expected outcomes after each step prevent readers from getting lost mid-tutorial.
- Common mistakes sections reduce support requests and boost reader confidence.
- Visual cues and formatting patterns matter as much as the words you choose.
Step 1: Define a Single Action Per Step
The One-Action Rule
The most common structural mistake in step-by-step tutorials is cramming multiple actions into a single step. When a reader sees "Click the settings icon, then navigate to Privacy, and toggle off location sharing," they're actually processing three distinct decisions. If something goes wrong at any point, they can't pinpoint where they went off track. As our guide to what a step-by-step guide actually is explains, each step should represent one discrete action that moves the reader forward.
The one-action rule forces you to think from your reader's perspective. Before writing, list every physical or mental action required to complete the task. Count mouse clicks, menu selections, form inputs, and decision points separately. Each of those is a candidate for its own numbered step. You'll end up with more steps than you initially expected, and that's perfectly fine. More steps with clear, single actions always outperform fewer steps packed with complexity.
Splitting Compound Steps
When you draft your tutorial, review each step and ask: "Does this require the reader to do more than one thing?" If yes, split it. A step like "Download the app and create your account" should become two steps. The download might fail, the reader might need to troubleshoot permissions, or account creation might require email verification. Each of those interruptions becomes a dead end when actions are bundled together.
After drafting your tutorial, have someone unfamiliar with the topic follow it literally. Every place they hesitate reveals a step that needs splitting.
What you should have at the end of this step: A numbered list of single-action items, each representing one discrete thing the reader needs to do. No step should contain the word "and" connecting two separate actions.
Step 2: Write Action-Oriented Step Headings
The Verb-First Formula
Every step heading should begin with a strong action verb. "Click," "Open," "Select," "Navigate," "Enter" these words immediately tell readers what type of action they're about to perform. Compare "Account Settings Configuration" with "Open Your Account Settings." The second version is instantly clearer because the verb signals both the action and its target. This principle applies whether you're writing instructions for software, cooking recipes, or DIY projects.
Verb-first headings also improve scannability. When readers scroll through your tutorial, they process the first word of each heading fastest. If that word is a verb, they can quickly locate the step they need without reading full sentences. This matters especially for readers who return to your tutorial as a reference document rather than reading it start to finish. If you want more tips on writing engaging how-to content, check out these content creation tips for writing guides that rank on Google.
Common Heading Mistakes to Avoid
Avoid vague headings like "Next Steps" or "Additional Configuration." These tell the reader nothing about what they'll actually do. Similarly, don't use passive constructions like "The file should be saved" when you mean "Save the file." Passive voice in headings creates ambiguity about who acts. Your reader needs to know instantly that they are the one doing something, not the software or system.
Never use step headings like "Important Information" or "Things to Know." These aren't steps — they're context. Put that information inside the relevant step's body text instead.
What you should have at the end of this step: Every step in your tutorial now starts with an imperative verb. Each heading is specific enough that a reader could understand the required action without reading the body text beneath it.
| Weak Heading | Problem | Strong Heading |
|---|---|---|
| Account Setup | No verb, no clear action | Create Your Account |
| The Dashboard | Descriptive, not actionable | Navigate to the Dashboard |
| Settings | Single noun, ambiguous | Open the Settings Menu |
| Saving Your Work | Gerund weakens imperative | Save Your Project File |
| Final Touches | Vague, non-specific | Review and Publish Your Page |
Step 3: Add Context and Expected Outcomes to Each Step
Providing Brief Context
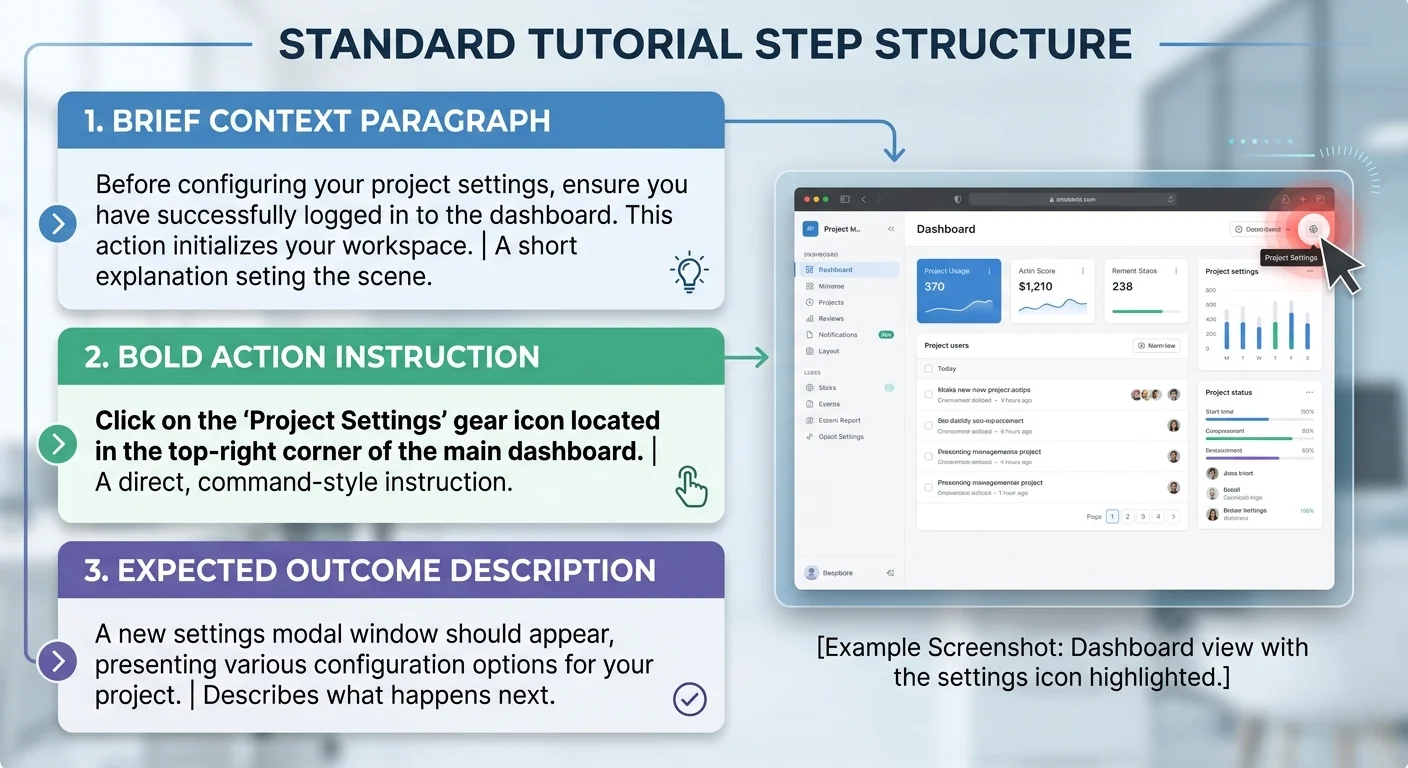
Each step needs a sentence or two of context before the action instruction. This answers the reader's unspoken question: "Why am I doing this?" For example, before telling someone to "Select UTF-8 from the encoding dropdown," explain that this encoding setting prevents special characters from displaying incorrectly. Context keeps readers oriented and helps them make informed decisions when their situation differs slightly from your example.
"A step without context is a command. A step with context is a lesson."
Keep context brief — two to three sentences maximum. You're not writing a textbook chapter; you're giving readers just enough background to understand why this action matters. If a step requires extensive explanation, that's often a sign the step itself needs to be broken into smaller pieces. Readers who want a deeper background on a topic can explore resources on free reading apps that let them study reference materials alongside your tutorial.
Telling Readers What They Should See
After each step's action instruction, describe the expected outcome. "You should now see a green confirmation banner at the top of the screen," or "Your file list should display three new entries." This confirmation checkpoint prevents readers from proceeding with an incomplete or failed action. It's the single most effective way to reduce confusion in any step-by-step tutorial, and it's the element most writers forget to include.
Expected outcomes also serve as debugging tools. When a reader doesn't see what you described, they know immediately that something went wrong, and they know exactly which step caused the problem. For more on integrating these kinds of visual cues and examples into your writing, this guide on adding visuals, examples, and CTAs to tutorials covers the topic thoroughly. Including screenshots alongside outcome descriptions makes your tutorial even more bulletproof.
Write expected outcomes in the present tense: "Your screen now shows..." rather than "Your screen will show..." The present tense feels more immediate and certain.
What you should have at the end of this step: Each step in your tutorial now includes one to two sentences of context before the instruction and a clear expected-outcome statement after it. Readers can self-verify their progress at every stage.
Step 4: Format Each Step for Scannability and Retention
Building Visual Hierarchy
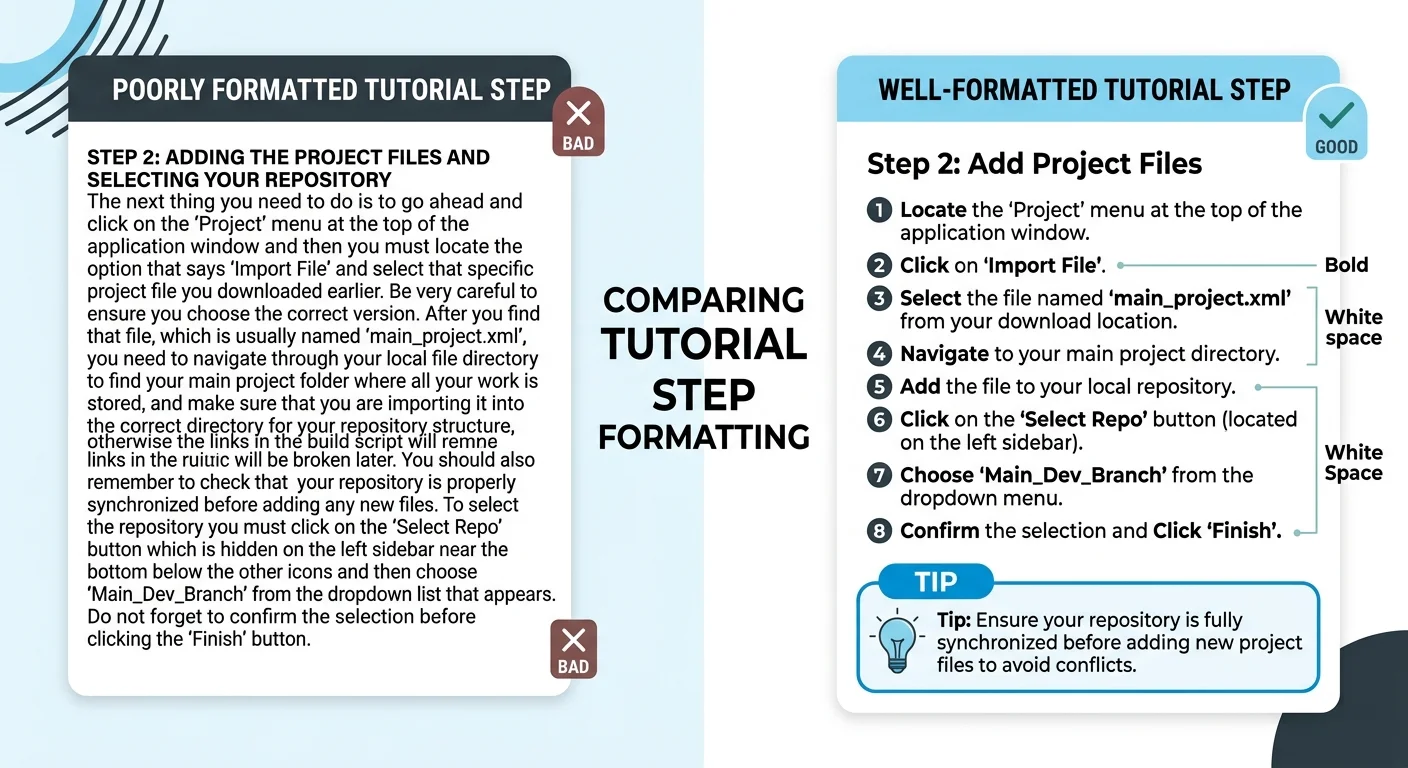
Formatting is where many tutorials fail despite having solid content. Each step should follow a consistent visual pattern so readers can predict where information lives. Bold the primary action instruction within each step. Use a consistent marker, like an italicized outcome line, for expected results. When readers recognize the pattern after two or three steps, they process subsequent steps faster because their brain already knows where to look.
Read also AI Prompt Writing Tips for Better Outputs
White space is your ally. Separate steps with generous padding. Keep paragraphs within each step short, three to four sentences maximum. If a step requires a sub-list of options or settings, use bullet points rather than embedding them in a run-on sentence. These formatting choices aren't cosmetic; they directly impact comprehension. Research on instructional design consistently shows that well-formatted instructions improve task completion rates by significant margins.
Using Tips, Warnings, and Notes
Callout elements, tips, warnings, and notes add a layer of guidance that body text alone can't provide. Place a tip after a step when there's a faster or smarter way to accomplish the same action. Use warnings before steps that involve irreversible actions like deleting data or overwriting files. Notes work well for platform-specific variations or version differences. These elements give your writing instructions a professional, thorough quality that readers associate with trustworthy content.
Don't overload your tutorial with callouts. One tip or warning every two to three steps is the sweet spot. More than that creates visual noise and dilutes their impact.
The spacing, visual hierarchy, and callout strategy you choose should remain consistent across your entire tutorial. Consistency builds reader confidence. If you're writing beginner guides, this predictability is especially important because new users are already managing cognitive load from unfamiliar subject matter. For a deeper look at structuring content for novice audiences, see this article on writing clear step-by-step instructions for complete beginners.
What you should have at the end of this step: A fully formatted tutorial where each step follows a predictable visual pattern, context, bolded action, and expected outcome, with callouts placed strategically rather than randomly throughout the document.
Frequently Asked Questions
?How do I apply the one-action rule when steps feel naturally connected?
?Is it better to have fewer long steps or more short single-action steps?
?How long does it take to properly structure a step-by-step tutorial this way?
?What's the most common mistake writers make when formatting tutorial steps?
Final Thoughts
Structuring a step-by-step tutorial isn't about adding more information; it's about organizing what you already know into a format readers can actually follow. Single actions per step, verb-first headings, brief context, expected outcomes, and consistent formatting: these five elements transform mediocre tutorials into genuinely useful resources.
Master this framework once, and every piece of instructional content you create afterward will be clearer, more professional, and more effective at helping your audience succeed.
Disclaimer: Portions of this content may have been generated using AI tools to enhance clarity and brevity. While reviewed by a human, independent verification is encouraged.