Learning how to write guides with step-by-step tutorials is one of the most valuable skills any content creator or educator can develop. Writing instructions that beginners can actually follow without confusion, frustration, or repeated support requests requires more than subject matter expertise. It demands empathy, structure, and deliberate testing.
Most instructional content fails not because the information is wrong, but because the writer assumed too much about what the reader already knows. This practical framework gives you a repeatable process for creating beginner guides that work the first time someone reads them.
Whether you're documenting software, teaching a craft, or onboarding new team members, these content creation tips will transform how you communicate complex processes. The stakes are real: unclear instructions cost businesses an estimated $62 billion annually in lost productivity, and they erode trust with your audience fast.
Key Takeaways
- Define your reader's exact starting point before writing a single instruction.
- Each step should contain only one action to prevent cognitive overload.
- Testing your instructions with a real beginner reveals blind spots immediately.
- Visual aids reduce comprehension errors by up to 323% compared to text alone.
- A consistent format builds reader confidence and speeds up task completion.
Step 1: Identify Your Audience and Define the Starting Point
Every set of instructions begins with an assumption about what the reader already knows. Get this wrong, and nothing else matters. Your beautifully formatted guide will sit unread while confused users search for something simpler. Before you outline a single step, you need to establish the precise knowledge level of your target audience. Understanding how step-by-step instructions work in practice helps you see why this audience definition phase is so foundational to effective instructional writing.
Start by listing every prerequisite your reader needs. If you're writing a tutorial on setting up a WordPress site, does your reader know what a domain name is? Have they purchased hosting? Can they navigate a browser's address bar? Write down every assumption, then challenge each one. The assumptions you leave unexamined become the exact points where beginners get stuck and abandon your guide entirely.
Build a Reader Profile
Create a one-paragraph profile of your ideal reader. Include their technical comfort level, their motivation for following your guide, and the specific outcome they want. A cooking tutorial reader who wants to impress a date has different patience thresholds than someone meal-prepping for efficiency. This profile becomes your decision filter for every word you write when in doubt about whether to explain something, check it against your reader profile.
Write your reader profile on a sticky note and keep it visible while drafting. Every sentence should serve that specific person.
At the end of this step, you should have a documented reader profile plus a complete list of prerequisites. You should also have a clear statement of what the reader will achieve by the end of your guide. This upfront investment typically takes 15 to 30 minutes and saves hours of rewriting later. Without it, you're essentially guessing, and guessing is the enemy of clear beginner guides.
Step 2: Outline Your Steps and Choose the Right Structure
With your audience defined, map out every action the reader must take from start to finish. Don't write prose yet, just list the raw actions in order. Most writers skip this outlining phase and jump straight into drafting, which produces guides that meander, repeat themselves, or skip critical steps. Your outline is the skeleton that holds everything together, and it's far easier to rearrange bullet points than to restructure finished paragraphs.
An effective outline technique is to physically perform the task yourself while recording each micro-action. Screen-record yourself, use voice memos, or have someone watch and take notes. You'll be surprised by how many small actions you perform unconsciously. Opening a menu, scrolling to a specific section, clicking a confirmation dialog, these invisible steps are precisely what trip beginners up. Mapping processes visually with tools like AI flowchart generators can help you spot branching paths and decision points you might otherwise miss.
The One-Action Rule
Each numbered step in your tutorial should contain exactly one action. "Click the Settings icon and navigate to Privacy, then toggle off location sharing" is three steps crammed into one. Splitting actions makes instructions easier to follow because readers can check off each step with confidence before moving to the next. This single principle eliminates more confusion than any other structural choice you can make in writing instructions.
Combining multiple actions into one step is the number one cause of user errors in instructional content. Always split them.
By the end of this step, you should have a sequential, numbered outline where each item describes one discrete action. Review the outline for logical flow, check that no steps are missing, and confirm the sequence matches your reader's experience. If your task involves decision points or branching paths, note those clearly; they'll need special formatting treatment in the next step.
Step 3: Write Clear Instructions and Format for Scannability
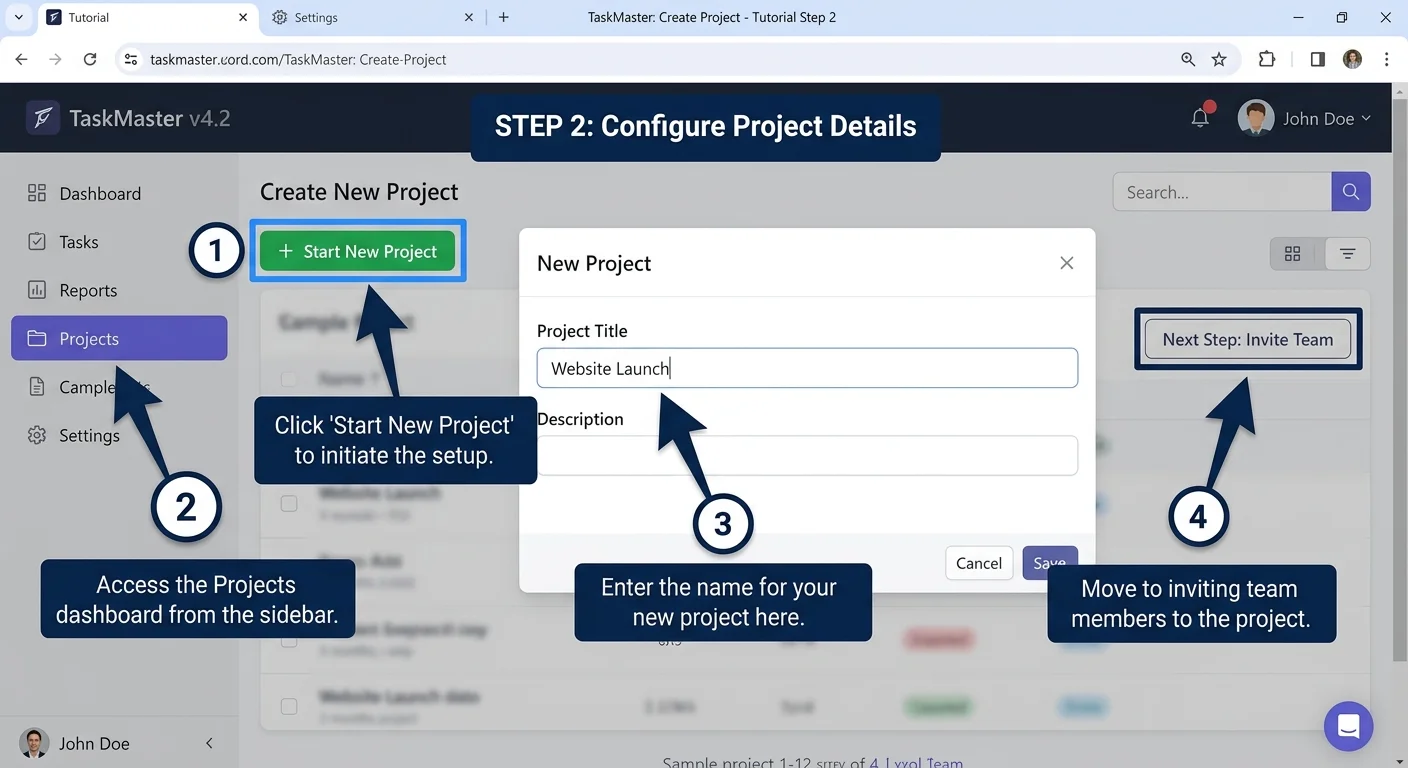
Now you transform your outline into polished instructional content. Begin each step with an imperative verb: click, type, select, open, drag. The imperative mood eliminates ambiguity because it tells the reader exactly what to do rather than describing what happens. Avoid passive constructions like "the button should be clicked" in favor of direct commands like "click the blue Save button." This writing style respects your reader's time and reduces cognitive load significantly.
Language Patterns That Work
Use concrete, specific language instead of vague references. "Click the gear icon in the top-right corner" beats "go to settings" because it tells the reader exactly what to look for and where to find it. Include the name, location, and appearance of every interface element you reference. Color, position, and label text all help beginners confirm they're in the right place. When writing beginner guides, over-specification is almost always better than under-specification.
| Vague Instruction | Clear Instruction | Why It's Better |
|---|---|---|
| Go to settings | Click the gear icon in the top-right corner | Specifies location and visual cue |
| Enter your information | Type your full name in the "Name" field | Names the exact field and input |
| Save your work | Click the blue "Save Draft" button below the editor | Identifies color, label, and position |
| Upload a file | Drag your PNG file onto the dotted upload area | Specifies file type and interaction method |
| Check the output | Verify the preview shows your updated header text | Tells what success looks like |
Format your guide for scanning, not just reading. Use bold text for interface elements, consistent numbering for sequential steps, and bullet points for non-sequential lists. Add "what you should see" confirmations after every two to three steps so readers can verify they're on track. These checkpoint moments prevent small errors from compounding into major problems ten steps later. White space matters; too dense paragraphs of instructions are functionally invisible to stressed beginners.
Add a brief "You should now see..." confirmation after every 2-3 steps. These checkpoints catch errors before they cascade.
Visual aids dramatically improve comprehension. Screenshots with annotations, short GIF demonstrations, or even simple diagrams reduce the gap between what you describe and what the reader perceives. Research consistently shows that combining text with relevant images improves learning outcomes by significant margins. At the end of this step, you should have a complete draft with formatted steps, visual aids, and checkpoint confirmations placed throughout the guide.
"The best instructional writing is invisible — readers notice the task getting done, not the words telling them how."
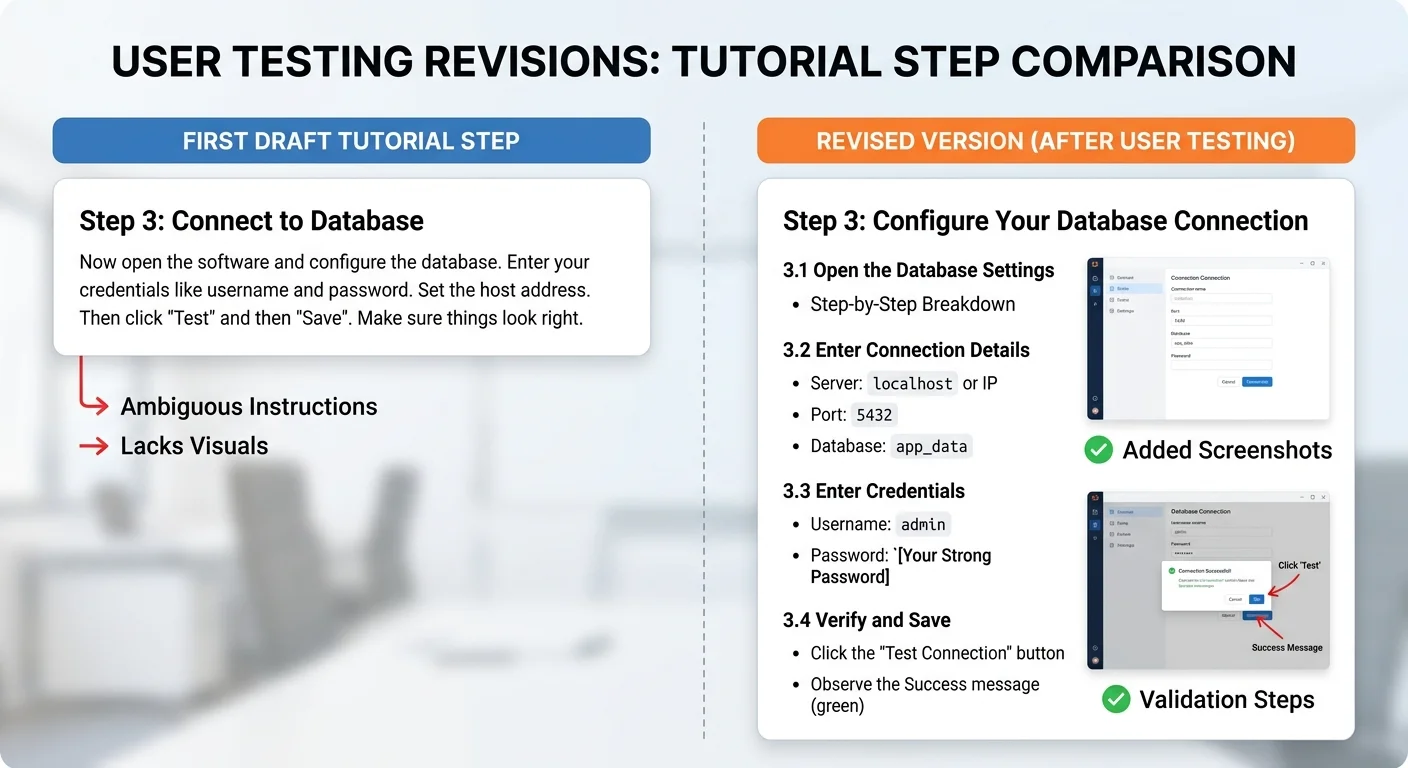
Step 4: Test With Real Beginners and Refine Based on Feedback
Your draft is complete, but it isn't finished. The single most effective quality check for any tutorial is watching a real beginner attempt to follow it without your help. This usability testing phase reveals gaps that no amount of self-editing can catch, because you cannot unknow what you already know. Find someone who matches your reader profile, hand them the guide, and observe silently. Resist every urge to help or explain; that urge pinpoints exactly where your instructions fail.
During testing, note every point where the tester hesitates, asks a question, or makes an error. These friction points are gold. A three-second hesitation means the instruction is unclear. A question means information is missing. An error means the step either contains too many actions or uses ambiguous language. Record these observations precisely, including which step number triggered the problem, so you can systematically address each one in revision.
Common Testing Mistakes to Avoid
Don't test with colleagues who have domain knowledge, they'll breeze through gaps that would stop a true beginner cold. Don't test with only one person, because individual quirks can mislead you. Three to five testers typically surface around 85% of usability issues. And don't dismiss feedback because "that's obvious." If a tester struggled with it, your future readers will too. The content creation tips that matter most often come directly from watching real people interact with your work.
If you can't find testers, try the 24-hour rule: set your draft aside for a full day, then re-read it imagining you know nothing about the topic.
After testing, revise methodically. Address missing steps first, then unclear language, then formatting issues. Run the revised version through at least one more tester if possible. You should end this step with a guide that a genuine beginner can complete independently, without questions, from start to finish. That's your quality bar; anything less means the guide needs another revision pass. Writing step-by-step tutorials that truly work is an iterative process, and the testing phase is where good guides become great ones.
Frequently Asked Questions
?How do I apply the one-action rule without splitting steps unnaturally?
?Is a reader profile really necessary for a short tutorial?
?What if I can't find a real beginner to test my instructions with?
?Does the 323% comprehension improvement from visuals apply to all guide types?
Final Thoughts
Writing clear step-by-step instructions is a craft that improves with practice and honest feedback. The framework above, defining your audience, outlining single-action steps, writing with specificity, and testing with real beginners, works for any subject matter and any format.
Your readers don't need cleverness or personality from instructional content; they need clarity, consistency, and confidence that following your guide will actually produce the promised result. Commit to testing every tutorial you publish, and you'll build a reputation for guides that genuinely help people accomplish things on their own.
Disclaimer: Portions of this content may have been generated using AI tools to enhance clarity and brevity. While reviewed by a human, independent verification is encouraged.